

How to create a blog: what you’ll need
Just a quick note, though. This guide is not about using WordPress.com. Instead, we’ll show you how to start your own blog using self-hosted WordPress so that you’re in full control. This is our recommended approach.
<a href="https://www.bluehost.com/track/dezinefo/" target="_blank"> <img border="0" src="https://bluehost-cdn.com/media/partner/images/dezinefo/120x240/120x240BW.png"> </a>
If you want to create a blog, here’s a simple step-by-step guide:
- Sign up for web hosting (we recommend Bluehost).
- Choose a hosting plan.
- Pick a domain name for your blog.
- Complete your hosting registration.
- Install WordPress.
- Log in and write your first blog post.
None of these steps require in-depth technical knowledge and we’ll show you the whole process of how to set up a blog in detail.
Once you get your blog up and running, you’ll probably want to start writing and likely tweak its appearance/functionality. To help you do that, we’ll also show you how to:
 Write your first blog post using the WordPress Editor
- Change how your WordPress blog looks using a “theme”
- Add functionality to your blog using tools called “plugins”
As long as you know how to use sites like Facebook and have an overall confidence when it comes to “web stuff”, you can follow this guide. We promise!
Step 1: Purchase hosting and your domain name
Making your blog accessible to people around the world requires two things:
 Hosting – this is the engine that powers your site. While you don’t “see it”, every single website on the Internet has a host powering it.
- Domain – this is like your blog’s permanent address. For example, ours is
themeisle.com. Check out this post if you need help coming up with a good name.
You can purchase your hosting and domain at the same time – so don’t worry too much about the nitty-gritty details right now. But before you can do that, you need to choose a WordPress host. Because of WordPress’ popularity, there are a huge number of WordPress hosts.
We’ve personally tested the performance and reliability of these hosts. And after that testing, we recommend Bluehost to new WordPress bloggers.
Here’s why:
- It’s affordable. You can host your site for the price of a small latte each month – it’s just $2.95 per month for your first 12 months.
- You get a free domain name when you sign up. This ties in with affordability – your own domain would otherwise cost $10+.
- You can easily install WordPress. With just a few clicks, you can launch the WordPress software and have a working blog. No tech knowledge needed!
- It has enough performance to get you started. When you’re just starting out, Bluehost offers plenty of performance to keep your site loading.
All in, it will cost you about $35.40 to host your blog at Bluehost for the entire year, which includes your free domain name.
That’s about as cheap as it’s going to get if you want to create a WordPress blog.
How to sign up for WordPress hosting at Bluehost
To get started, click here to go to Bluehost. If you scroll down on that page, you should see a list of Bluehost’s WordPress hosting plans.
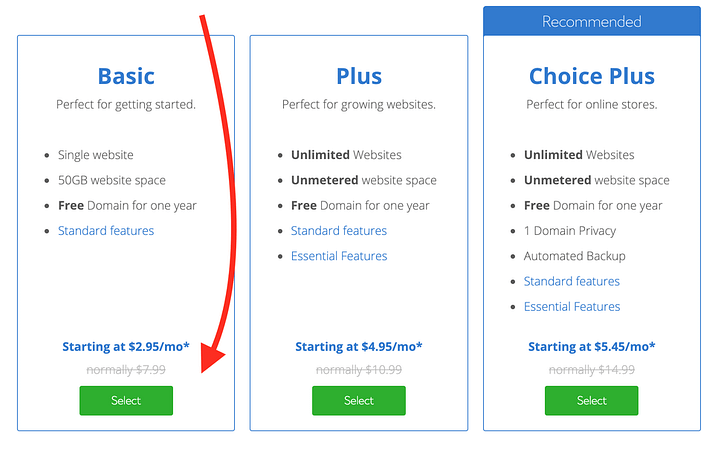
For beginners, we recommend the cheap Basic plan because it packs plenty of power for your fledgling blog. Click the SELECT button to start the process:
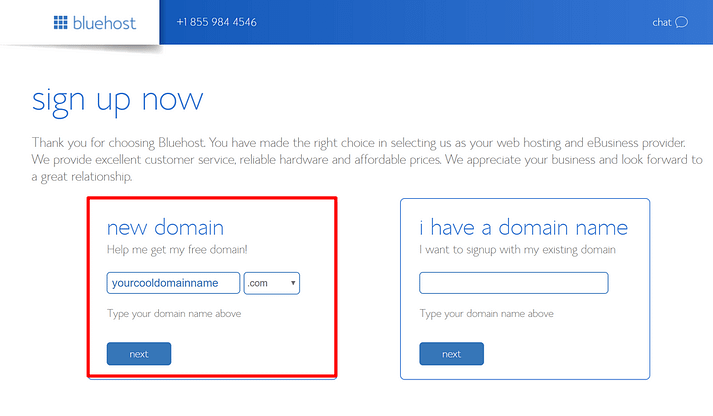
On the next screen, enter the domain name you want to use for your blog in the new domain box and click Next. Remember – you get this for free:
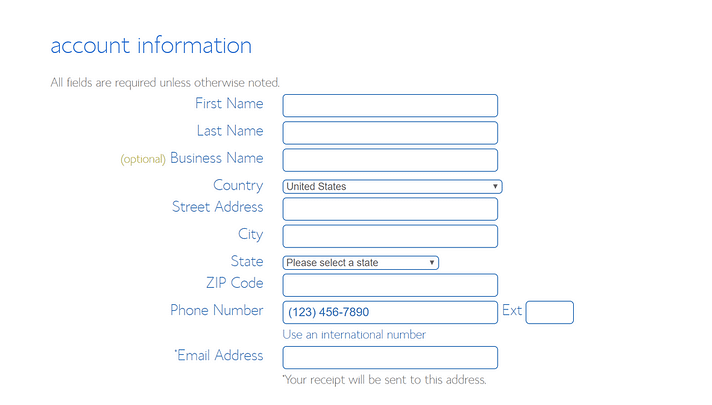
On the final screen, you’ll need to enter basic account and billing details at the top:
As you scroll down, you’ll see a Package Information section at the bottom. Here, you can choose how many years of hosting service to purchase, as well as any add-ons that you want. While Bluehost will check some of these add-ons by default, you can safely de-select them:
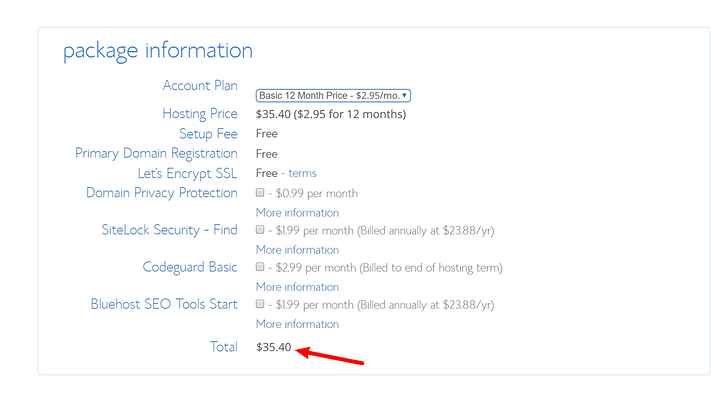
All in, you should pay around ~$35 for your domain name and one year of hosting.
Once you’ve filled in all of the information, click SUBMIT at the bottom to complete your purchase.
Step 2: Install the free WordPress software
If you want to create a WordPress blog, you’re going to, unsurprisingly, need to install the WordPress software.
We know this might sound a little intimidating – but we think you’ll be surprised by how easy it is to install WordPress.
When you completed the sign-up process in the previous step, you should have received an email from Bluehost with details on how to log in to the Bluehost Customer Area.
Go ahead and log in to Bluehost.
As soon as you log in for the first time, Bluehost will give you a simple wizard that takes you through the process of installing WordPress on your new site.
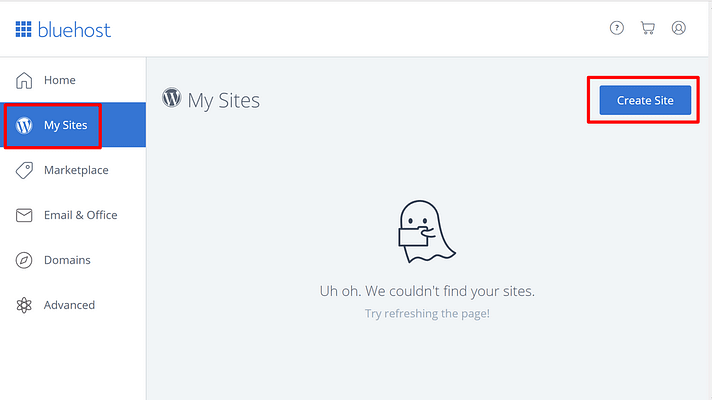
Don’t see the setup wizard? No worries, it’s still really easy to install WordPress with Bluehost. Just go to the My Sites area and click the Create Site button to launch the wizard:
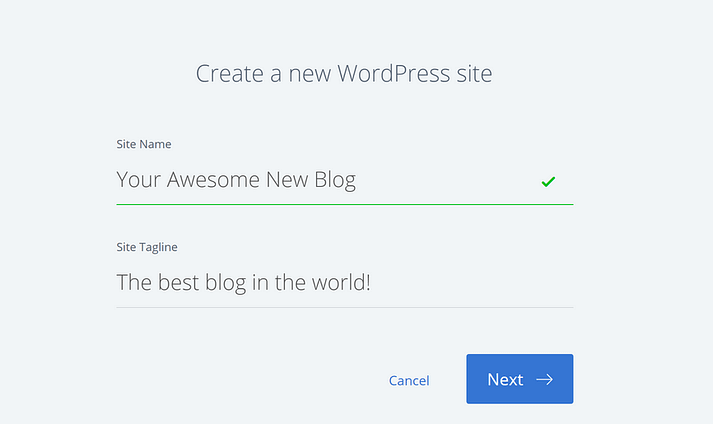
Then, you’ll be able to fill in all the important details for your site’s name and the username/password that you’ll use to manage your WordPress blog:
Once you finish the install process, you can access your new blog’s dashboard by going to yourdomain.com/wp-admin.
Step 3: Go ahead and write your first blog post – you earned it!
Now that you learned how to create a WordPress blog, you’re probably excited to get to blogging!
We’ll show you how to change how your blog looks and functions in a second. But first, let’s go over just how easy it is to write a blog post on your new website.
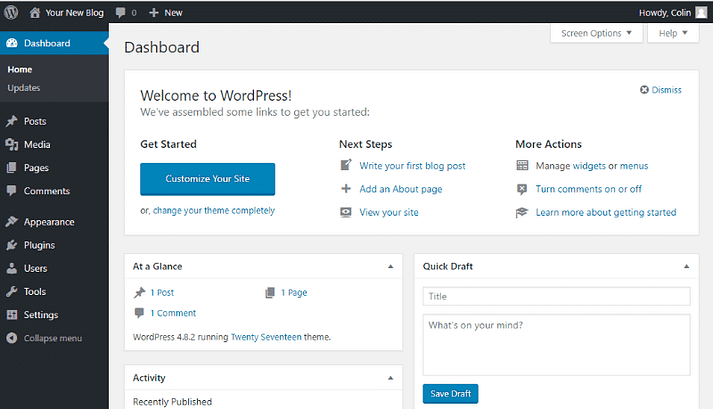
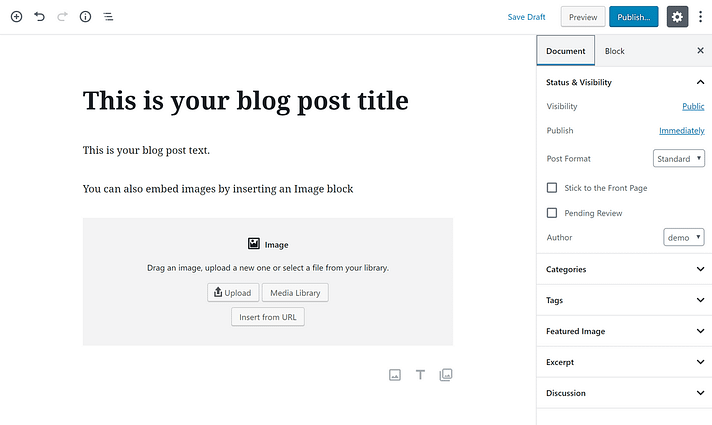
When you first log in to your blog’s WordPress dashboard, you should see a screen like this:
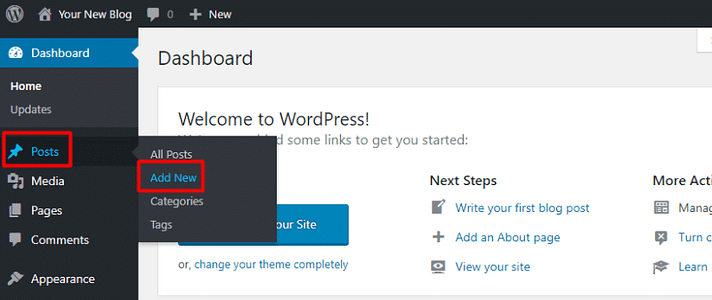
To write a blog post:
- Hover over Posts
- Click Add New
This will launch the WordPress Editor, which lets you write your blog posts using a really intuitive block system.
To add text, you just click and type. For other content – like an image or an embedded YouTube video, you can add new “blocks”.
Step 4: Here’s how to change how your blog looks
When you create a WordPress blog, one of the major benefits that you get is access to WordPress’ huge collection of themes and plugins. Here’s a quick overview of the two:
Themes – these change how your blog looks
Plugins – these add functionality to your blog
We’ll cover the former in this section.
As soon as you create a WordPress blog, you already have a theme active. This is either the default WordPress theme or the theme that you chose during the Bluehost Setup Wizard.
But there are actually thousands of themes available for WordPress, so you’re by no means limited to that small selection.
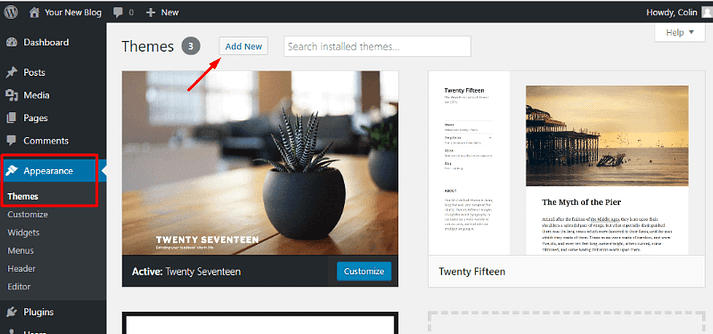
How to install a WordPress theme
Once you’ve found a theme that you love, WordPress makes it easy to add that theme to your site.
Here’s how:
- Hover over Appearance
- Select Themes
- Click the Add New button
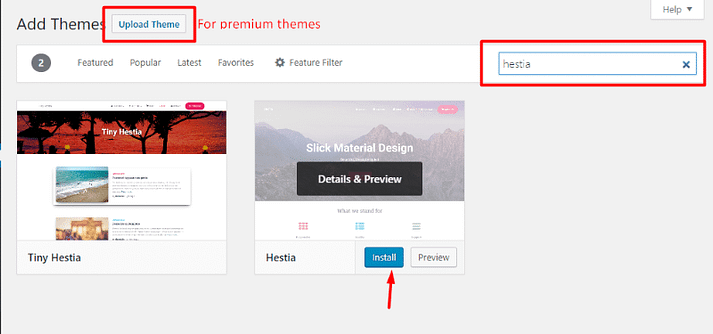
- If you chose a free theme at WordPress.org, search for the theme by name and click Install.
- If you purchased a premium theme, click the Upload Theme button and upload the ZIP file you should have received when you purchased the theme
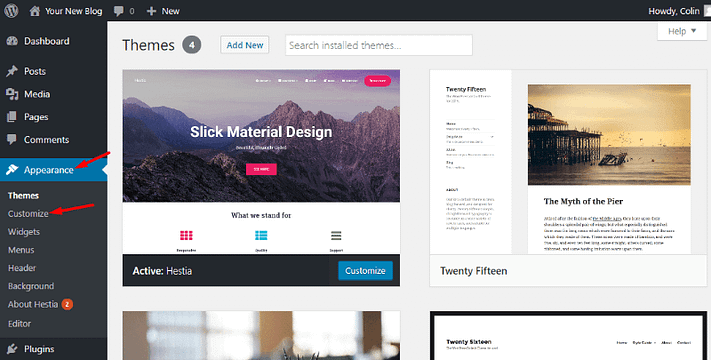
After installing your theme, make sure to click the Activate button to make it active on your site.
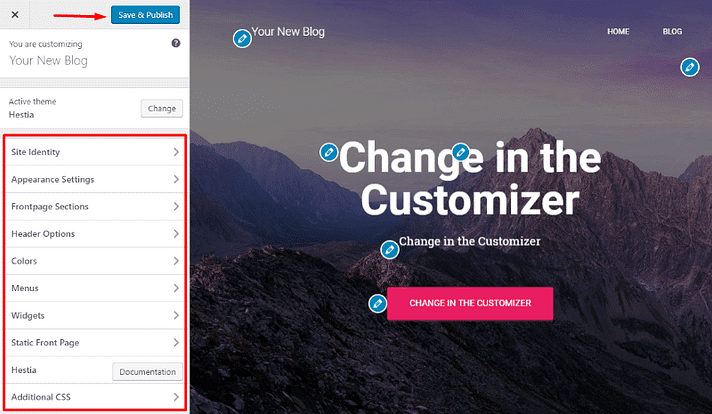
How to further customize your WordPress theme
To further customize your theme, you can use something called the WordPress Customizer. This interface lets you make certain tweaks to your theme without needing to know code.
You can access it by going to Appearance → Customize:
Depending on the theme that you chose, you may have a different set of options in the left sidebar. But in general, you can:
- Make changes by using the options on the left
- See a real-time preview on the website preview on the right
- Make your changes live by clicking Save & Publish
Step 5: Here’s how to add functionality to your blog
While themes are mostly about appearances, plugins are more focused on helping you add functionality to your blog.
When you first create a WordPress blog, you pretty much only have the ability to write blog posts and create pages.
Plugins are what allow you to add more advanced functionality like:
- Contact forms
- Social network buttons
- Backups
- Improved SEO
- And lots, lots more
If you can think of a feature, there’s probably a plugin for it. That’s because the WordPress community offers over 50,000 free plugins, plus there are thousands of premium plugins.
How to install WordPress plugins
We will write a detailed guide on how to install WordPress plugins. But here’s the quick version:
- Go to Plugins → Add New
- If you chose a free plugin at WordPress.org, search for the plugin by name and click Install Now.
- If you purchased a premium plugin, click the Upload Plugin button and upload the ZIP file you should have received when you purchased the plugin.
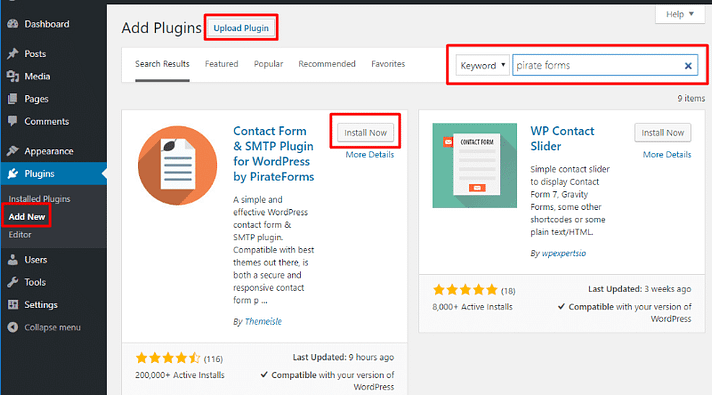
Make sure to Activate the plugin after installing it.
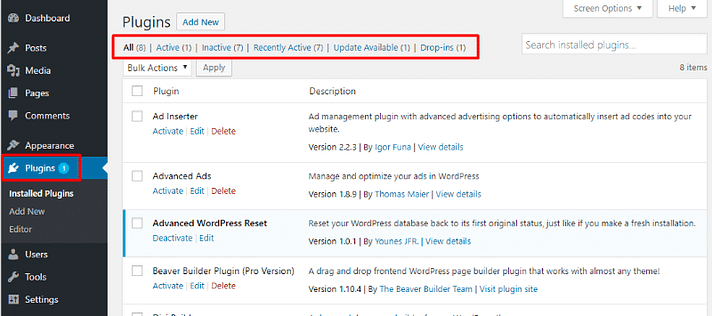
You can always manage your existing plugins by going to the Plugins tab:
What to do after you create a WordPress blog
Ok, so you managed to create a WordPress blog, install your own theme, and add some functionality with plugins.
What next?
Well, the world is your oyster! But if you’re like most people, you’ll probably want to look for ways to:
- Get more visitors to your blog
- Make money from your blog
And if you’re a blogging beginner, you might be interested in the 44 things our team of bloggers wish they knew before starting a blog.
And if you’re looking for everything in one place, we will write a whole guide on how to grow a personal blog.
Now get out there and make your brand new WordPress blog a success!
Thanks for sharing your Blog. It was really goodwordpress website development services
ReplyDeleteWordpress Development Services